Customising Toolbars
Removed in 2007
Customising existing toolbars and menus and creating new ones can help to provide your application with a clear and intuitive user interface.
The following are all some examples of the things you can change or customise:
1) Remove controls that you do not use from the built-in toolbars.
2) Add additional controls to the built-in toolbars.
3) Change the functionality of the existing commands on the built-in toolbars.
4) Change the images that appear on your built-in toolbars.
Any changes you make to your toolbars and menus are reflected immediately and are saved when Excel is closed.
There are several ways you can customise your toolbars and menus.
1) Using the Toolbar Options Shortcut Menu at the end of a toolbar.
2) Using the Alt Key to move or remove commands.
3) Using the (Tools > Customise) dialog box.
Using the Toolbar Options Shortcut Menu
When a toolbar is docked to one side of the window a small downward arrow appears on the far right of the toolbar.
This is the Standard and Formatting toolbars on two lines.
 |
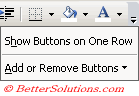
Clicking on this small downward arrow will display the toolbar options shortcut menu and allows you to add and remove command buttons.
Displaying the "Add or Remove Buttons" submenu allows you to quickly add or remove the command buttons.
The Add or Remove Buttons shortcut menu from the Toolbar Options shortcut
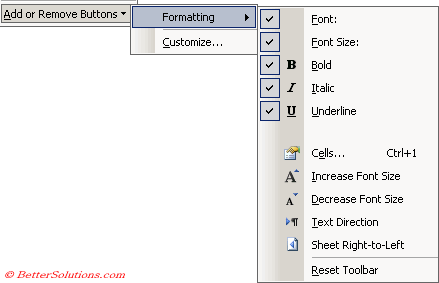 |
The check marks next to the button names indicate which buttons are currently included on the toolbar.
It is possible to select and unselect buttons using this submenu.
The exact position of the commands is pre-determined using this method and cannot be changed.
Any changes you make are reflected immediately.
There is also a Reset Toolbar button at the bottom of the shortcut menu which will reset your toolbar back to its default.
There is an additional button on the Standard and Formatting toolbars that allows you to toggle between displaying these on one or two rows.
 |
Using the Alt Key
You can hold down the Alt key to remove or copy commands from existing toolbars or menus.
Holding down the Alt key allows you to use the Left mouse button to move commands between your toolbars and menus.
This method can also be used to remove commands completely. Just drag the command and drop it anywhere other than on a menu or toolbar (typically over the worksheet area).
You can also hold down both the Ctrl and Alt keys to copy commands from one place to another.
Using the (Tools > Customise) dialog box
You can customise your toolbars and menus using the (Tools > Customise) dialog box.
Displaying this dialog box switches you into "modification mode" and gives you full control over all the toolbars and menus.
The easiest way to add commands to toolbars is to use the "Commands" tab.
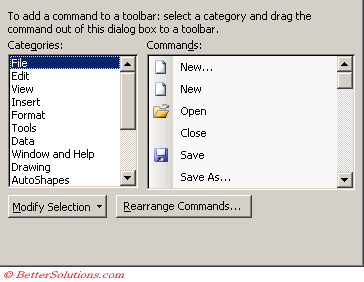 |
Each of the categories in the left column corresponds to a drop-down menu on the Main Menu.
It is also possible to add whole menus and sub menus using the dialog box, just select "Built-in Menus" from the categories list box.
This dialog box also lets you add custom macro buttons to toolbars and menus as well as allowing you to create new toolbars and menus.
For more information on how to customise your toolbars and menus, please see the specific pages later in this section.
(Tools > Customise) Options tab
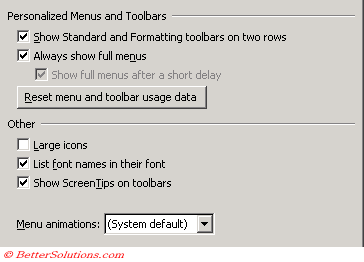 |
Show Standard and Formatting toolbars on two rows - Positions the two toolbars on two rows as opposed to one.
Always show full menus - Displays all the commands when a menu is displayed. If not ticked then Personalised menus are used. This setting affects all your Microsoft Office programs.
Show full menus after a short delay - When you rest the pointer over an open menu, shows all the commands on the menu after a brief delay.
Reset my usage data - Resets all the menus and toolbars to their default settings and deletes any personalised data that may have been accumulated. This doesn't change the location of toolbars, doesn't remove any buttons or commands you've added by using the Customize dialog box, and doesn't add buttons or commands you've deleted.
Large Icons - Increases the size of toolbar buttons so that they are easier to see.
List font names in their font - Displays each font name as a sample of the font in lists that display fonts, such as the Font and Style lists on the Formatting toolbar. Clear this check box to display font lists more quickly by listing fonts in a standard font. When you select or clear this check box, the setting affects all your Microsoft Office programs.
Show screenTips on toolbars - Displays on-screen descriptions of toolbar buttons when the pointer pauses on them.
Menu animations - Changes the way menus display when you click on a command. For example, Slide Menu Animation causes the menus to display with a sliding motion. System default, Random, Slide, Unfold, Fade. The default is Fade.
Resetting your Toolbars and Menus
It is possible to reset a built-in toolbar or menu so it contains the default commands.
This is useful if you have removed commands which you want to use at a later date.
Select the toolbar in the Toolbars list and press the Reset button. You will receive a prompt asking you to confirm the action.
If the "Reset" button is disabled and the "Delete" button is activated then you have selected a custom toolbar.
The check boxes that are ticked indicate all the toolbars which are currently visible.
(View > Customise)(Toolbars tab) dialog box
 |
Alternatively you could use the Reset Toolbar button at the bottom of the Toolbar Options Shortcut Menu. This will reset your toolbar back to its default.
Another way to display a toolbar is to right click on any toolbar and choose from the list.
Important
Alternatively you could select (View > Toolbars > Customise) to display the "Customise" dialog box.
A quick way to display the Customise dialog box is to right click on any toolbar and select "Customise" or press (Ctrl + Shift + F10) twice.
If you want to ensure that a new command is always available you should add it to both the Worksheet and the Chart Menu bars. Using the Customise dialog box it is possible to display both menu bars at the same time.
If you want to define a group of commands on several toolbars or menus you can add your commands to one and then just copy them across, using the Ctrl key.
All the changes your make to your toolbars and menus are stored in a ".xlb" file. To find out more about this file please refer to the Advanced Techniques.
© 2026 Better Solutions Limited. All Rights Reserved. © 2026 Better Solutions Limited TopPrevNext