DatePicker
There was a built-in DateTimePicker control but this only works with Office 32-Bit, not Office 365 (which is 64-Bit).
It is possible to select and validate your dates using a combination of built-in controls.
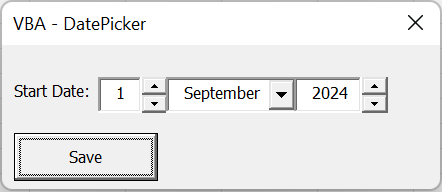 |
This uses a combination of two TextBoxes, two SpinButtons and one ComboBox.
This alternative works with Office 365 and is fully backwards compatible with all earlier 32-Bit versions on Office.
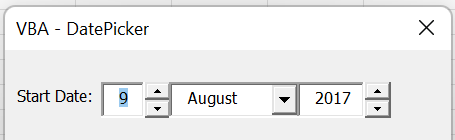
Choosing The Day
To enter the day either type a number straight in or use the spin buttons to increment or decrement the current number.
 |
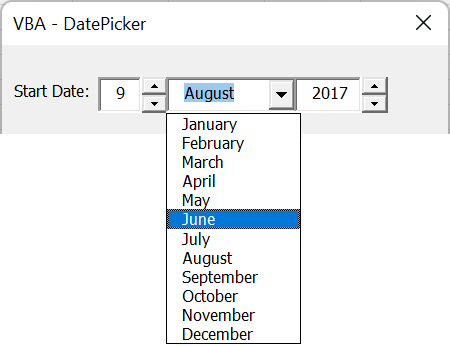
Choosing The Month
To enter the month use the drop-down to select the month.
 |
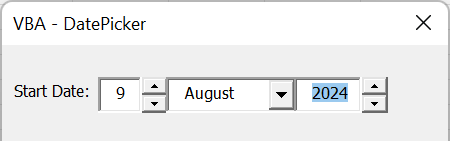
Choosing The Year
To enter the year either type a number straight in or use the spin buttons to increment or decrement the current number.
 |
Reading The Date
To read the actual date you need to combine the three components.
Setting The Default Date
To set the default date you need to extract the three components from an actual date.
Add the Userform
Create a Userform
(Insert > Userform)
Caption: "VBA - DatePicker"
Resize: Height - 100, Width - 230
(View > Toolbox)
Add the Controls
Add a Label
Change the Caption to "Start Date:"
Resize: Height - 18, Width - 42
Reposition: Top - 18, Left - 6
Add a TextBox
Change the Name to "txtStartDay"
Resize: Height - 18, Width - 22
Reposition: Top - 16, Left - 48
Add a SpinButton
Change the Name to "spnStartDay"
Resize: Height - 18, Width - 12
Reposition: Top - 16, Left - 70
Add a ComboBox
Change the Name to "cboStartMonth"
Resize: Height - 18, Width - 66
Reposition: Top - 16, Left - 82
Add a TextBox
Change the Name to "txtStartYear"
Resize: Height - 18, Width - 34
Reposition: Top - 16, Left - 146
Add a SpinButton
Change the Name to "spnStartYear"
Resize: Height - 18, Width - 12
Reposition: Top - 16, Left - 180
Add a CommandButton
Change the Name to "btnSave"
Change the Caption to "Save"
Resize: Height - 24, Width - 72
Reposition: Top - 44, Left - 6
Add a Variable
At the top of the userform code module declare a variable with the data type Long.
This variable will be used to hold the date that is currently selected.
Add a private variable
Add the following code
Add the Events
Add a UserForm_Initialise event
(View > Code) when the Userform is displayed
Change the top left drop-down to "Userform"
Change the right drop-down to "Initialize"
Add the following code
Add a spnStartDay_Change event
Change the top left drop-down to "spnStartDay"
Change the right drop-down to "Change"
Add the following code
Add a txtStartDay_Change event
Change the top left drop-down to "txtStartDay"
Change the right drop-down to "Change"
Add the following code
Add a cboStartMonth_Change event
Change the top left drop-down to "cboStartMonth"
Change the right drop-down to "Change"
Add the following code
Add a spnStartYear_Change event
Change the top left drop-down to "spnStartYear"
Change the right drop-down to "Change"
Add the following code
Add a txtStartYear_Change event
Change the top left drop-down to "txtStartYear"
Change the right drop-down to "Change"
Add the following code
Add a btnSave_Click event
Change the top left drop-down to "btnSave"
Change the right drop-down to "Click"
Add the following code
Add the Helper Subroutines
Underneath all the current code add the following three subroutines.
The first subroutine is to set the date that is displayed.
The second subroutines is to retrieve the date that is displayed.
The third subroutine is to initialise the controls when the userform is first loaded.
Check that everything compiles and run the code.
(Debug > Compile Project)
Double click the Userform1 to display the Userform
Press F5 or (Run > Run Userform)
Change the date.
And Press Save to display a messagebox displaying the date that was selected.
 |
© 2026 Better Solutions Limited. All Rights Reserved. © 2026 Better Solutions Limited TopPrevNext