2003 Options
The screenshots below are from Excel 2003 Options. These were all replaced in 2007.
Edit Tab, Editing Options
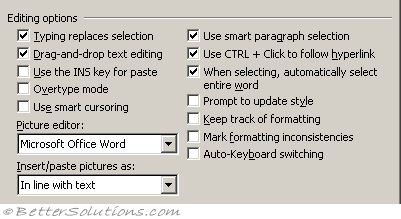 |
Typing replaces selection - If you have text highlighted and you type some more text then the highlighted text will be replaced. If this is not checked then it will put the text at the front of whatever you have highlighted. (Advanced, Editing - typing replaces selected text)
Drag and drop text editing - Allows you to move or copy text using the mouse. Text can also be easily copied by holding down the Ctrl key. Select the text and hover the mouse over the selection until the mouse pointer changes to a left-pointing arrow before dragging. If this is not checked then the selection is extended when you drag over text. (Advanced, Editing)
Use the INS (Insert) key for paste - Allows you to use the Insert key "INS" as a method of pasting content from the clipboard. This is equivalent to (Edit > Paste) and (Ctrl + V ). (advanced, editing - use the insert key to control overtype mode)
Overtype mode - Replaces existing text as you type, one character at a time. You can also double-click the "OVR" on the status bar to toggle this on and off . (Advanced, editing - use overtype mode)
Use smart cursoring - (Added in 2003). Specifies that the insertion point moves as you scroll up or down. When you press the Left Arrow, Right Arrow, Up Arrow or Down Arrow keys, the insertion point responds at the page currently in view, not at its position prior to scrolling. (Advanced, editing)
Picture editor - Click the application you want Word to use as the picture editor. Choice of Microsoft Word or Photo Editor.
Insert/Paste pictures as - Determines how pictures are inserted relative to text in your document. You can specify that your pictures are inserted either inline with text, move with the text, or that the text wraps around, in front of, or behind the picture. Choice are "In line with text", "Square", "Tight", "Behind text", "In front of text", "Through", "Top and Bottom". (Advanced, cut copy paste)
Use smart paragraph selection - Determines whether or not the paragraph mark is selected when you select the whole paragraph. When you include the paragraph mark as you cut and paste a paragraph, an empty paragraph is not left behind in your source document, and the paragraph formatting is automatically carried with your selection. (Advanced > editing)
Use Ctrl + Click to follow hyperlink - (Added in 2002). Select this check box to follow - or open -hyperlinks by pressing CTRL while clicking the hyperlink. Clear this check box if you prefer to have hyperlinks open by just clicking them. (Advanced, editing)
When selecting, automatically select entire word - (Added in 2002). If checked it means that it it is very difficult to highlight parts of a word(s). When you drag the cursor over spaces or periods the whole word(s) are highlighted. (Advanced, editing)
Prompt to update style - (Added in 2002). Specifies that Word prompts you when you directly modify text that contains a style, and then select the same style again. When prompted, you can either update the style based on recent changes or reapply the formatting of the style. (Advanced, editing).
Keep track of formatting - (Added in 2002). Select this check box to allow Word to keep track of, or store, formatting information as you type, so that you can easily apply it elsewhere. (Advanced, editing)
Mark formatting inconsistencies - (Added in 2002). Marks formatting with wavy, blue underlines when it is similar, but not exactly the same, as other formatting in your document. Word can identify direct formatting that's similar to formatting you've applied more frequently, list formatting that's similar to other list formatting, and direct formatting that matches a style. To use this option, the Keep track of formatting check box must also be selected. (Advanced, editing)
Auto-Keyboard switching - (Added in 2002). When selected, changes the keyboard language and font to the language of the text where the insertion point is placed; when not selected, changes only the font.
Edit Tab, Cut and Paste options
 |
Show paste options buttons - (Added in 2002). Determines whether the Paste Options button, which enables you to specify the formatting of pasted text, appears at the bottom corner of your text as you paste it. (Advanced, cut, copy & paste at the end))
Smart cut and paste - (Added in 2002). Word helps you add and remove extra spaces when cutting and pasting text. Before Word 2002 this option was called "Use smart cut and paste" and appeared under the editing options. (Advanced, cut, copy & paste at the end))
Settings - (Added in 2002). Set specific options for pasting. (Advanced, cut, copy & paste at the end))
Edit Tab, Click and Type
 |
Enable click and type - Allows you to type and automatically apply certain types of formatting for centring text, aligning paragraphs, and wrapping text by double-clicking any open area of your document. This feature is available only in print layout view and Web layout view. (advanced, editing)
Default paragraph style - Click the style you want to use to automatically format paragraphs when the Enable Click and Type check box is selected. (advanced, editing)
Edit Tab, Miscellaneous
Tab and backspace set left indent - (Removed in 2002). This controls how the tab and backspace keys are interpreted when using the autoformatting for bulleted and numbers lists. When checked a number is automatically applied top the beginning of a paragraph. A backspace will remove it though. When unchecked the tab and backspace behave normally.
Allow accented uppercase in French - (Removed in 2002). For text formatted as French, allows Word to add or suggest accent marks for uppercase letters. For some variants of French, such as French Canadian, it is not necessary to use this option as those dictionaries always use the accented uppercase form.
File Locations Tab, File locations
If you cannot see the full path you can double-click on the entry to display the Modify Location dialog box.
The Modify Location dialog box will not display any files that are in these folders. It is just for navigating to a folder.
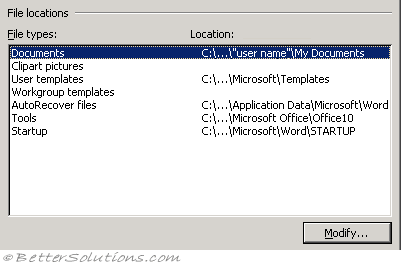 |
Select the folder location you want to change and press the Modify button to browse to a different folder.
Documents - The folder path that your (File > Open) and (File > Save As) dialog boxes will default to.
Clipart Pictures - The folder path that Word will default to when you select (Insert > Picture > From File).
User templates - The folder path that Word will default to when you save a Word document as a template.
Workgroup templates - The folder path that contains all your workgroup templates.
User options - (Removed in 2002).
AutoRecover files - If you are saving AutoRecover information then this is the folder path used to store that information.
Tools - ??
Startup - Any documents or files in this folder will be automatically opened when Word starts.
If you change the location, be sure that the new folder is a secure location.
File Locations Tab, Startup
This location is treated as a trusted location when you have the following option checked:
(Tools > Macro > Security)(Trusted Publishers tab, "Trust all installed add-ins and templates").
Word 2013 - C:\Documents and Settings\"user name"\Application Data\Microsoft\Word\STARTUP\
Word 2010 - C:\Documents and Settings\"user name"\Application Data\Microsoft\Word\STARTUP\
Word 2007 - C:\Documents and Settings\"user name"\Application Data\Microsoft\Word\STARTUP\
Word 2003 - C:\Documents and Settings\"user name"\Application Data\Microsoft\Word\STARTUP\
In addition to the startup location defined in this dialog box there is in fact another startup folder.
This folder location should not be used because using multiple startup folders can create problems.
Word 2013 - C:\Program Files\Microsoft Office\
Word 2010 - C:\Program Files\Microsoft Office\OFFICE11\STARTUP\
Word 2007 - C:\Program Files\Microsoft Office\OFFICE11\STARTUP\
Word 2003 - C:\Program Files\Microsoft Office\OFFICE11\STARTUP\
This folder location cannot be changed and is machine specific.
This location is only treated as a trusted location in Word 2000.
File Locations Tab, Documents
In Word 2007 this appears under (Save, save document)
Word 2013 - C:\My Computer\"user name"\My Documents\
Word 2010 - C:\My Computer\"user name"\My Documents\
Word 2007 - C:\My Computer\"user name"\My Documents\
Word 2003 - C:\My Computer\"user name"\My Documents\
File Locations Tab, Clipart pictures
This is the default folder location when you press (Insert > Picture > From File).
If you insert a lot of graphics and pictures into your documents it may be worth specifying a different default folder.
Word 2013 - C:\My Computer\"user name"\My Documents\My Pictures\
Word 2010 - C:\My Computer\"user name"\My Documents\My Pictures\
Word 2007 - C:\My Computer\"user name"\My Documents\My Pictures\
Word 2003 - C:\My Computer\"user name"\My Documents\My Pictures\
If you leave this folder location empty the last folder you browsed to is the default for next time.
This default is only modified for that session of Word. Closing word will mean the default returns to the My Pictures folder.
File Locations Tab, User templates
Word 2013 - C:\Documents and Settings\"user name"\Application Data\Microsoft\Templates\
Word 2010 - C:\Documents and Settings\"user name"\Application Data\Microsoft\Templates\
Word 2007 - C:\Documents and Settings\"user name"\Application Data\Microsoft\Templates\
Word 2003 - C:\Documents and Settings\"user name"\Application Data\Microsoft\Templates\
This folder location is very important and should never be changed as it is the location of your Normal.dot template.
Any changes made to the Normal.dot template will be automatically saved in this folder.
For more details please refer to the Templates > User Templates page.
File Locations Tab, Workgroup templates
This usually refers to a folder on a shared network.
Using this folder to store your templates eliminates the need to provide individual copies of the templates to all the users.
For more details please refer to the Templates > Workgroup Templates page.
File Locations Tab, AutoRecover files
In Word 2007 this appears under (Save, save document)
The auto recover file may contain unsaved information that would otherwise be lost from your original document.
If your original document was damaged, you may be able to recover information from the AutoRecover file.
Word 2013 - C:\Documents and Settings\"user name"\Application Data\Microsoft\Word\
Word 2010 - C:\Documents and Settings\"user name"\Application Data\Microsoft\Word\
Word 2007 - C:\Documents and Settings\"user name"\Application Data\Microsoft\Word\
Word 2003 - C:\Documents and Settings\"user name"\Application Data\Microsoft\Word\
File Locations Tab, Tools
If anyone knows what this is used for can they tell us
Word 2013 - C:\Program Files\Microsoft Office\Office10\
Word 2010 - C:\Program Files\Microsoft Office\Office14\
Word 2007 - C:\Program Files\Microsoft Office\Office12\
Word 2003 - C:\Program Files\Microsoft Office\Office11\
General Tab, General options
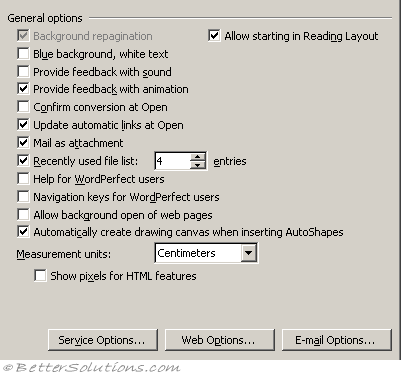 |
Background repagination - Repaginates the document automatically as you work. This is switched on automatically in Print Layout, Reading Layout and Web Layout views. It is possible to switch this option off in the Normal and Outline views. (Advanced, General (bottom) - enable background repagination)
Blue background, white text - Displays text as white characters on a blue background.
Provide feedback with sound - Adds sounds to certain actions or events throughout Word and Office. For example, Word plays a sound when an alert appears or when a process is complete. To change the sound that is associated with an event, open the Sounds folder in the Windows Control Panel. Your computer must have a sound card to play most sounds. (Advanced, General (bottom) )
Provide feedback with animation - Animates the movement of your mouse in Word and your other Office programs, and uses special animated cursors in place of the usual static cursors for actions such as printing, repagination, saving, or Auto Formatting. Also animates such Word actions as background saving, find and replace operations, and the ruler in Auto Hide mode. (Advanced, General (bottom) )
Confirm conversion at open - The correct converter will be used automatically when you open a file created in another application. (Advanced, General (bottom) - confirm file format conversion at open )
Update automatic links at open - If a document contains any links that are defined as "automatic update" then you will receive a prompt asking if you want to update them when the file is opened. If your template also contains links then you will receive two prompts. (Advanced, General (bottom) )
Mail as attachment - Attaches the current document to a mail when you click "Send To Mail Recipient" on the File menu. Clear this checkbox if you want Word to insert the contents of the current document into a mail message instead of attaching it. This check box is available only if you have Outlook installed on your PC.
Recently used file list - The maximum number of files recently used you can have on your File drop-down is nine. This allows you to quickly open them again. (Advanced, Display - show this number of recent documents)
Help for Word Perfect users - Displays instructions or demonstrates a Word equivalent when you press a Word Perfect for DOS key combination.
Navigation keys for Word Perfect users - Changes the functions of the Page Up, Page Down, Home, End and Escape keys their Word Perfect equivalents.
Allow background open of web pages - (Added in 2002). Allows you to open Web documents and still have the ability to use Word for other things. You will be able to open HTML files in the background. (advanced, general)
Automatically create drawing canvas when inserting autoshapes - (Added in 2002). Determines whether or not a drawing canvas is automatically inserted around AutoShapes when you insert them into your document. A drawing canvas helps you arrange drawing objects and pictures and move them easily as a unit. (advanced, editing options)
Allow starting in Reading Layout - (Added in 2003). Opens documents from emails in the reading layout view. This option only affects documents opened from emails. Reading Layout is the default view for documents opened from attachments, switching this off will mean that documents are then opened in their default view (ie the view they were last saved in).
Asian Fonts - ?? Additional options that is displayed relating to which language is default / installed ??
Measurement units - Inches. Click the default unit for the horizontal ruler and for measurements that you type in dialog boxes. (advanced, display - show measurements in units of )
Show pixels for HTML features - Changes the default unit of measure in dialog boxes to pixels. (advanced, display)
Service Options - (Added in 2003). Sets options for customer feedback, online Help and templates, and shared workspaces. (advanced, general (bottom) )
Web Options - Sets options for how your document will look and respond when viewed in a Web browser. (advanced, general (bottom) )
E-mail Options - (Removed in 2007 ??). Sets options for sending and receiving e-mail messages in Microsoft Word, such as creating a signature and stationery. You can also set font options for sending and replying to e-mail messages in Word.
Print Tab, Printing options
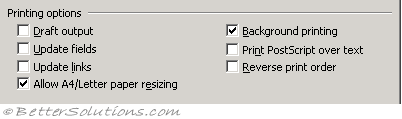 |
Draft output - Prints this document with minimal formatting, which may make the document faster to print. Some printers do not support this option. (advanced, print - use draft quality)
Update fields - Updates all the fields (inc. those in headers and footers) automatically before a document is printed. (Display, printing options - update fields before printing)
Update links - Updates any linked information in a document before you print it. (Display, printing options - update linked data before printing)
Allow A4/Letter paper resizing - For some countries, the standard paper size is Letter; for others, the standard size is A4. Select this check box if you want Word to automatically adjust documents formatted for another country's standard paper size (for example, A4) so they print correctly on your country's standard paper size (for example, Letter). This option affects the printout only, not the formatting in your document. (advanced, print - scale content for A4 or 8.5*11 paper sizes)
Background printing - Prints documents in the background, which lets you continue working in Word while you print a document. Background printing uses additional system memory; to speed up printing, clear the Background printing check box. Be aware that this will not update your field codes and repaginate your document. (advanced, print - print in background)
Print postscript over text - Prints PostScript code in a converted Word for the Macintosh document on top of document text instead of underneath it. For example, select this check box to print a converted Word for the Macintosh document that contains a watermark or other PostScript code. This check box has no effect if a document contains no PRINT fields. (advanced, print)
Reverse print order - Prints pages in reverse order, beginning with the last page. Don't select this check box if you're printing an envelope. (advanced, print ? - print pages in reverse order)
Print Tab, Include with Document
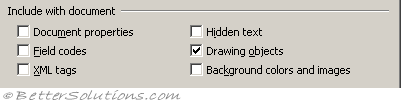 |
Document properties - Prints the document's summary information on a separate page after printing the document. Word stores summary information on the Summary tab (File menu, Properties command). (Display, printing options - print document properties)
Field codes - Prints field codes instead of field results. For example, prints { TIME \@ "MMMM d, yyyy" } instead of February 22, 1997. (advanced, print - print field codes instead of their values)
XML tags - (Added in 2003). Prints the XML tags applied to an XML document. You must have a schema attached to the document, and you must apply elements provided by the attached schema. The tags appear in the printed document. (advanced, print - print xml tages)
Hidden text - Prints hidden text in a document. Word doesn't print the dotted underline that appears on the screen under hidden text. (display, printing options - print hidden text)
Drawing objects - Clear the Drawing objects check box to suppress printing of the drawing objects you created in Word using the tools on the Drawing toolbar. Word prints a blank box in place of each drawing object. Documents that contain drawing objects may print faster when the Drawing objects check box is cleared. (display, printing options - print drawings created in word)
Background colors and images - (Added in 2003). Prints all background colors and images. Clearing this check box may speed your printing process. (display, printing options - print background colors and images)
Print Tab, Options for current document only
 |
Print data only from forms - Prints the data entered into an online form without printing the online form. (advanced, print - print only the data from a form)
Print Tab, Other
 |
Default tray - Click the tray you want your printer to use by default when you print a document from Word. Have set to use Printer settings. (advanced print)
Print Tab, Options for Duplex printing
 |
Front of the sheet - Set the order of pages on the front of each sheet. Clear the check box to print page 1 on top, or select it to print page 1 on the bottom. (advanced, print - print on front of sheet for duplex printing)
Back of the sheet - Set the order of pages on the back of each sheet. Clear the check box to print page 2 on top, or select it to print page 2 on the bottom. (advanced, print - print on back of sheet for duplex printing)
Save Tab, Save options
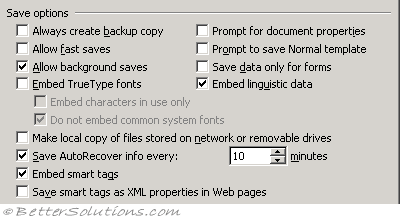 |
Always create backup copy - Copies the previous version of a document as a backup copy every time you save a document. Each new backup copy replaces the previous backup copy. Word saves the backup copy (with a file name extension .BAK) in the same folder as the original. When you select Always create backup copy, Word clears the Allow fast saves check box because Word can create backup copies only when it performs a full save. (advanced, save)
Allow fast saves - (Removed in 2007). This is a technique used a long time ago when PC's were a lot slower. The concept is that when a document is modified the original document is kept the same and any changes are tagged on to the end of the document. This is no longer necessary.
Allow background saves - This allows yout to continue working while your document is saved. You can tell when a background save is taking place because the save icon will appear in the status bar. KB922033 (advanced, save)
Embed TrueType fonts - Make sure this is unticked. Stores the True Type fonts used to create this document along with the document. Others who open the document will be able to view and print it with all the fonts used to create it, even if those fonts are not installed on their PC. If you want to save the document without embedding the entire fonts choose the "Embed characters in use only" checkbox. The "Do not embed common system fonts" was added in 2002. (advanced, save - embed fonts in this file). There is really no need to embed the standard true type fonts in your documents as they are so readily available and installed by default on most computers. Embedding non standard fonts may carry copyright restrictions which can prevent others from being able to make changes. (save tab - preserve fidelity when sharing this document)
Prompt for document properties - Otherwise it will open the (File > Properties) dialog box when you save a document for the first time asking for a title, subject, author etc
Prompt to save Normal template - Displays a message each time you quit Word that asks you if you want to save any changes made to the default settings, such as the font or the margins. If this check box is checked then Word will prompt you first asking if you want to save any changes to your Normal template. (advanced, save - prompt before saving Normal template).
Save data only for forms - Have it every 10 minutes although for large documents the saving may take a while. (advanced, preserve - save form data as delimited text file)
Embed linguistic data - (Added in 2002). Saves linguistic data - for example - speech and handwritten input data. Linguitic data refers to items such as speech to text and handwriting. (Advanced, preserve fidelity)
Make local copy of files stored on network or removable drives - (Added in 2002).
Save auto recover info every - Automatically makes a document recovery file at the interval set (in minutes between 1 and 120). If Word crashes then Word will open the Auto Recovery file next time Word is opened in an attempt to let you recover any unsaved work. This is not an equivalent of saving your document. (save , save documents - save autorecovery information every)
Embed smart tags - (Added in 2002). Make sure its unticked. Saves smart tags. Embedding smart tags in documents is definitely not recommended and can cause severe problems especially when documents are opened in different versions (advanced, preserve fidelity)
Save smart tags as XML properties in web page - (Added in 2002). Saves all the smart tags in one place in a Hypertext Markup Language (HTML) file. (advanced, preserve fidelity)
Save Tab, Default format
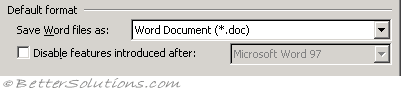 |
Save Word file as - Specifies the file format you want to use every time you save a document. Select Word Document (*.doc) to ensure that the latest version of Word is used ?? (save, save documents - saves files in this format)
Disable features introduces after - (Removed in 2007). Turns off features introduced in recent versions of Word. When you save the document, if your document contains items that will be converted, Word displays a list of the features it will convert so that the document can be used in previous versions.
Security Tab, File Encryption
 |
Password to open - If you type a Password to open, the document will open as read-only when a user types the correct password. If someone opens a document as read-only and changes it, it must be saved with a different name. If you forget or lose the password, you cannot open your document. A password is case-sensitive and can contain up to 15 characters, including letters, numerals, and symbols.
Advanced - (Added in 2002). Select an encryption type to make your documents more secure and to allow the use of longer passwords.
Security Tab, File Sharing
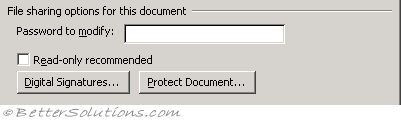 |
Password to modify - If you type a Password to modify, the document will open for editing when a user types the correct password. If you forget or lose the password, you can only open your document as read-only. A password is case-sensitive and can contain up to 15 characters, including letters, numerals, and symbols.
Read only recommendation - When the file opens, displays a recommendation that others open the document as read-only. If someone opens the document as read-only and changes it, it must be saved with a different name. You can select the Read-only recommended check box without setting any passwords.
Digital signatures - (Added in 2002). Add or remove a digital signature or view the properties of an existing signature.
Protect document - (Added in 2002). Protect or unprotect your document for tracked changes, comments, or forms.
Security Tab, Privacy Options
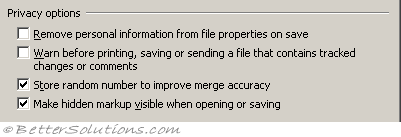 |
Remove personal information from this file on save - (Added in 2002). Avoid unintentionally distributing hidden information, such as the document's author or the names associated with comments or tracked changes.
Warn before printing, savng or sending a file that contains tracked changes or comments - (Added in 2002). If a document contains tracked changes or comments, you may want to remove them before you save or distribute it. Do this to minimize your risk of accidentally sharing private information.
Store random number to improve merge accuracy - (Added in 2002). When you compare and merge documents, Word uses randomly generated numbers to help keep track of related documents. Although these numbers are hidden, they could potentially be used to demonstrate that two documents are related. If you choose not to store these numbers, the results of merged documents will be less than optimal.
Make hidden markup visible when opening or saving - (Added in 2003). Displays all comments, annotations, deletions, and other types of revisions by default when you open or save a document. If you use the Show menu on the Reviewing toolbar to hide some or all of your revisions, and you select this option, your revisions will appear when you or another user opens the file. This option does not affect text formatted as hidden.
Security Tab, Macro Security
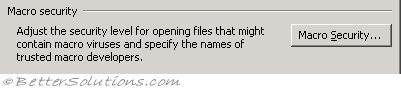 |
Macro Security - (Added in 2002). Displays the (Tools > Macro > Security) dialog box.
Spelling & Grammar Tab, Spelling
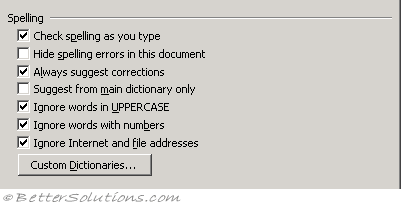 |
Check spelling as you type - Checks spelling automatically and marks errors as you type. (Proofing tab).
Hide spelling errors in this document - (document specific) Hides the wavy red line under possible spelling errors in your document. If you clear this check box, Word marks possible spelling errors with wavy red lines that are visible on the screen but that do not print. To display a list of suggested spelling corrections; click the wavy line with the right mouse button. (Proofing tab, Hide spelling errors in this document only).
Always suggest corrections - Automatically displays a list of suggested spellings for misspelled words during a spelling check. This check box does not affect background spelling checking.
Suggest from main dictionary only - Suggests correct spellings from the main dictionary but not from any open custom dictionaries. Clear this check box if you want Word to suggest correct spellings from all open custom dictionaries as well as from the main dictionary.
Ignore words in uppercase - Ignores words in uppercase letters during a spelling check.
Ignores words with numbers - Ignores words that contain numbers during a spelling check.
Ignore internet and file addresses - Select this check box if you want Word to automatically ignore Internet addresses (e.g. http://www.bettersolutions.com), file names (e.g. C:\temp\File1.doc) and electronic mail addresses (e.g. feedback@bettersolutions.com) during a spelling check.
Custom dictionaries - Lists the currently active custom user dictionaries. Word uses the listed custom dictionaries, in addition to the main spelling dictionary, when you run the spelling checker. When you click Add during a spelling check, Word adds the entry to the currently selected dictionary in the Custom dictionary list. To change the Custom dictionary list, click Dictionaries. Activates, creates, edits, adds, or removes custom dictionaries. If a custom dictionary appears in the Custom dictionary list on the left, it is already activated.
Spelling & Grammar Tab, Grammar
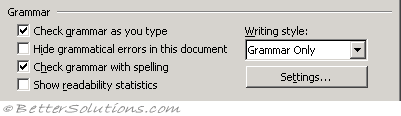 |
Check grammar as you type - Checks grammar automatically and marks errors as you type. This responsible for red underlining of grammar. (Proofing tab, Mark grammar errors as you type).
Hide grammatical errors in this document - (document specific) Hides the wavy green line under possible grammatical errors in your document. If you clear this check box, Word marks possible grammar errors with wavy green lines that are visible on the screen but that do not print. To display a list of suggested grammar corrections, click the wavy line with the right mouse button. (Proofing tab, Hide grammatical errors in this document only).
Check grammar with spelling - Clear this check box if you want to check spelling but not grammar. This check box is unavailable if the grammar checker is not installed for the language of the current selection. This check box does not affect background grammar checking. (Proofing tab).
Show readability statistics - Clear this check box if you don't want Word to display the Readability Statistics dialog box after you run the grammar checker. This check box does not affect background grammar checking. (Proofing tab).
Writing style - Click the writing style you want Word to use to check grammar in this document. For example, if this document is a scientific manuscript, click Technical. To create your own custom writing style, click Custom at the bottom of the Writing style list, and then click Settings. (Proofing tab).
Settings - Customizes the writing style and grammar rules that Word uses for grammar checking. This button is unavailable if the grammar checker is not installed for the language of the current selection. (Proofing tab).
Spelling & Grammar Tab, Proofing Tools
 |
Recheck document - Document checks the spelling and grammar again after you change spelling and grammar options or open a custom or special dictionary. The button name is Check Document if you haven't yet run the spelling and grammar checker during this Word session. When you click Recheck Document, Word also resets the internal Ignore All list. This means that, during the next spelling and grammar check, Word will check all words for which you previously clicked Ignore All. The name of the button was changed in 2007 back to Check Document. (Proofing tab).
Track Changes Tab, Markup
This group was called Track Changes but was changed to Markup in 2003.
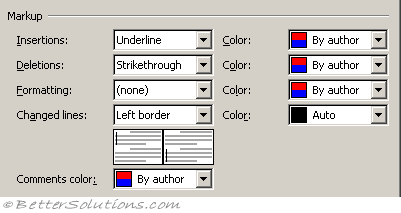 |
Insertions - Click the colour you want Word to use to mark new text.
Deletions - (Added in 2003). Click the colour you want Word to use to mark deleted text.
Formatting - Click the colour you want Word to use to mark text wherer formatting has changed.
Changed lines - (Added in 2003). This is the same as Changes lines group in 2002. Click the format you want Word to use to mark new text. Click the colour you want Word to use to mark new text. If you click By Author, Word automatically assigns unique colours to the first eight reviewers who revise a document. Click Auto to mark new text with the default text colour (usually black). If you click a specific colour, Word marks all reviewers' new text with the same colour.
Comments color - (Added in 2003). Click the colour you want to use to mark any comments that are inserted.
Track Changes Tab, Ballons
 |
Use ballons in print and web layout - Click to use balloons to show markup elements, such as comments and tracked changes, in the margin of your document. The drop-down list of choice was added ion 2003.
Preferred width - Set the desired balloon width.
Measure in - Set the measurement type for balloon widths. Choices are "Centimeters" or "Percent"
Margin - Choose the margin in which you want to display the balloons.
Show lines connecting to text - Shows a line connecting each balloon to the place in the document where a change occurred or where a comment was inserted.
Track Changes Tab, Printing
 |
Paper orientation - Click Auto to let Word decide the orientation that will provide the best layout for your document. Click Preserve to print the document with the orientation specified in the Page Setup dialog box. Click Force Landscape to allow the most room for balloons.
Track Changes Tab, Changed Lines
Mark - (Moved in 2003). Click the format you want Word to use to mark new text. Click the colour you want Word to use to mark new text. If you click By Author, Word automatically assigns unique colours to the first eight reviewers who revise a document. Click Auto to mark new text with the default text colour (usually black). If you click a specific colour, Word marks all reviewers' new text with the same colour.
Color - (Moved in 2003). Click the color you want Word to use for the changed-line bar. If you click Auto, Word uses the default text color (usually black).
User Information Tab, User Information
 |
Name - Type the name where you want Word to use in the Properties sheet (File menu), in letters and envelopes, to track changes, and to mark any comments you insert in a document. This is shared among all your Microsoft Office applications so you only need to change it once.
Initials - Type the initials you want Word to use for comment marks and for several built-in letter and memo elements. Type the initials you want Word to use for comment marks and for several built-in letter and memo elements. Be sure to fill this in since your name is used for the (File> Properties) and your initials are used for the (Insert > Comment).
Mailing address - your address is used for (Tools > Envelopes and labels) (Envelopes tab).
View Tab, Show
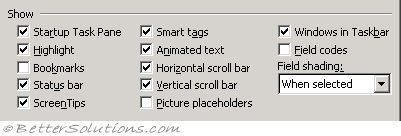 |
Startup task pane - (Removed in 2007). Displays the New Document task pane when Word is started. This was added in 2002.
Highlight - Displays highlighting on the screen. (display, page display options - show highlighter marks)
Bookmarks - Displays bookmarks by enclosing them in square brackets. The square brackets do not print. (advanced, show document content - show bookmarks)
Status bar - (Removed in 2007). Displays the status bar at the bottom of the window
Screen tips - Displays reviewer's comments in a yellow pop-up box on the screen when you hover the mouse above the current reference marks.
Smart tags - (Added in 2002). Displays purple dotted underlines beneath text labeled with smart tags. Smart tags indicate that you can do certain tasks. Adding a name to a Microsoft Outlook Contacts folder from within Word is one task that you might do with a person's name labeled with a smart tag. (advanced, show document content - show smart tags)
Animated text - Displays text animated on the screen. Clear this to see how text will look when printed. (advanced, show document content - show text animation)
Horizontal scroll bar - Displays the horizontal scroll bar at the bottom of the window. (advanced, display - show horizontal scroll bar)
Vertical scroll bar - Displays the vertical scroll bar on the right of the wirndow. (advanced, display - show vertical scroll bar)
Picture placeholders - Displays an empty box in place of each graphic in your document. Increases the speed at which you can scroll through and display a document that contains many graphics. If not pictures can always be viewed from print preview. (advanced, show document content - show picture placeholders)
Windows in taskbar - (Added in 2002). Displays a separate icon on the Microsoft Windows taskbar for each open window in your Microsoft Office program. Clearing this check box will display a single icon for your Office program on the Windows taskbar. (advanced, display - show all windows in the taskbar)
Field codes - Displays field codes instead of field results. For example, displays { TIME \@ "MMMM d, yyyy" } instead of February 22, 1997. To display field results instead of field codes, clear the Field codes check box. (advanced, show document content - show field codes instead of their values)
Field shading - This decides whether field codes have a shading background behind them to quickly identify them. Either "Never", "Always" or "When Selected". (advanced, show document content)
View Tab, Formatting marks
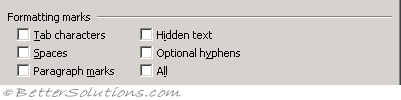 |
Tab characters - This character is not printed (->). (display, always show these formatting marks on screen)
Spaces - This will display spaces as dots. This character is not printed. (display, always show these formatting marks on screen)
Paragraph marks - This character is not printed. You must be able to see the paragraph marks since they play a crucial role with formatting, controlling fonts, styles picture locations etc. (display, always show these formatting marks on screen) This can also be found on the Home tab, Paragraph group.
Hidden text - Any text formatted as hidden will have a dotted line underneath it. This dotted line is not printed. (display, always show these formatting marks on screen)
Optional hyphens - Displays hyphens that indicate where you want to hyphenate a word when it needs to be divided at the end of a line. (display, always show these formatting marks on screen)
All - Displays all nonprinting characters listed under Nonprinting characters. You can also show all nonprinting characters by clicking Show/Hide on the Standard toolbar. (display, always show these formatting marks on screen - show all formatting marks)
View Tab, Print and Web Layout options
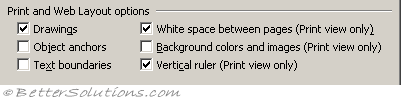 |
Drawings - Displays objects created with the drawing tools in Word in page layout. Clear this checkbox to hide drawings, which may allow you to scroll quicker. This option does not affect the printing of drawings in your document. (advanced, show document content - show drawings and textboxes on screen)
Object anchors - Displays object anchors, which indicate that an object us attached to a specific paragraph. Object anchors are visible only when the "All" check box is selected or when you show non printing characters. (display, always show these formatting on screen)
Text boundaries - Displays dotted lines around page margins, text columns and objects. (advanced, show document content - show text boundaries)
White space between pages - (Added in 2002). Displays the space between the top of the text and the top edge of the page.
Background colors and images - (Added in 2003). Displays background colors and images. (advanced, show document content - show background colors & images in Print Layout)
Vertical ruler - Displays the vertical ruler on the LHS of the window. Make sure that the "Ruler" is selected on the View menu. You can only display a vertical ruler in Print Layout view. (advanced, display - show vertical ruler in Print Layout view)
View Tab, Outline and Normal options
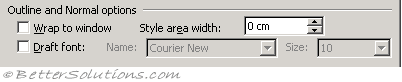 |
Wrap to window - Wraps the text to the document window, which makes it easier to read on the screen. To wrap the text as it will appear when printed, clear the Wrap to window check box. This is only available in Normal Layout view and not in Page Layout view. (advanced, show document content - show text wrapped within the document window)
Draft font - Displays most character formatting as underlined and bold, and displays graphics as empty boxes. Select the Draft font check box to speed up screen display in documents with extensive formatting. (advanced, show document content - use draft font in Draft and Outline view)
Style area width - Displays or hides the style area, which shows the applied style names to the left of the text. To open the style area, enter a positive decimal measurement, for example, .5". To close the style area, enter 0 (zero). This will display the style assigned to each paragraph to the left of the document ?? (advanced, display - style area pane width in Draft and Outline view)
View Tab, Compatibility for this document
 |
Font substitution - Substitutes fonts that are available on your system for fonts that are unavailable in your document. (Advanced, show document content)
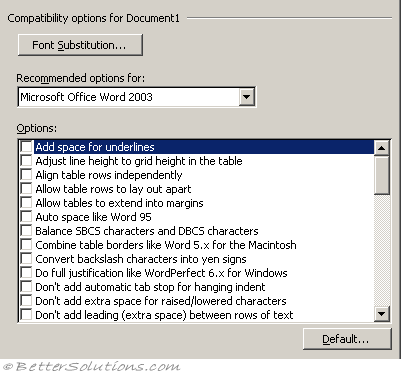
Recommended options for - This changes some on the settings in the Options list below to what is recommended for that particular version of Word. These settings only affect how the document is displayed in Word. No permanent changes to the document are made.
Options - An assortment of different settings that will change how your word document is displayed.
Default - Resets the settings in the Options list to the recommended options for that particular version of Word.
Add space for underlines - This option adds extra space for underlines.
Adjust line height to grid height in the table - When this option is turned on, the table row height snaps to the document grid. Used in East Asian text. This was previously called "Don't adjust line height to grid height in the table". In Word 2000.
Align table rows independently - When this option is not selected, centre-aligned or right-aligned non-wrapped tables are aligned as a whole without changing the relative positions of the rows. When this option is selected, the rows of a centre-aligned or right-aligned non-wrapped table are centre-aligned or right-aligned independently. For example, the right edges of the rows of a right-aligned non-wrapped table line up evenly if the right edges do not line up when the table is left-aligned.
Allow table rows to lay out apart - This option determines the behavior of a non-wrapped table that is laid out on the right side of a wrapped object and extends below the wrapped object. When this option is not selected, the remainder of the table is positioned out to the right with the first part of the table. When the option is selected, the remainder of the table is allowed to slide back to the left.
Allow tables to extend into margins - This option will retain the settings of a table that is extended past the margins of a document instead of using autofit to make the table fit within the margins. This is enabled automatically for Word 2003.
Auto space like Word 95 - This option determines how lines of text break (word wrap) in an East Asian Word 95 document.
Balance SBCS characters and DBCS characters - Not used in U.S. English Word.
Combine table borders like Word 5.x for the Macintosh - If a table contains two contiguous cells whose border is formatted differently, the left-most cell is displayed with the border width of the right-most cell.
Convert backslash characters into yen signs - Not used in U.S. English Word.
Do full justification like WordPerfect 6.x for Windows - To achieve full justification, WordPerfect compresses the spaces between words while Word expands them. This often results in different line breaks and leads to different page breaks.
Don't add automatic tab stop for handing indent - This option ignores the automatic tab stop that Word 6.0 uses when creating a hanging indent.
Don't allow hanging punctuation with character grid - This option prevents the use of punctuation marks in East Asian text when the character grid is enabled.
Don't balance columns for Continuous section starts - This option prevents Word from balancing columns at the end of a section or document.
Don't blank the area behind metafile pictures - This option prevents Word from obscuring any text or graphics surrounding an inserted metafile. Selecting this option decreases editing speed.
Don't break wrapped tables across pages - This option prevents a wrapped table from breaking across a page break. Note The Allow row to break across pages option has no effect in a wrapped table.
Don't center "exact line height" lines - This option changes the vertical position of text between the top of the line space and the bottom of the line space. With this option turned off, any extra space is split between the ascender and descender. With the option turned on, all the extra space goes to the descender.
Don't expand character spaces on the line ending Shift+Return - When a "justified" line of text ends with Shift+Enter, Word prevents extra spacing between words and makes the line appear as "Align Left".
Don't snap text to grid inside table with Inline objects - This option prevents Word from allowing East Asian text in a table cell to snap to the character grid when an "inline with text" object is inserted in the table cell.
Don't use Asian rules for line breaks with character grid - This option allows East Asian text to line-break the same as in earlier versions of Word when the character grid is turned on.
Don't use HTML paragraph auto spacing - If you have Auto set for Paragraph Spacing Before/After, and you turn this option on, Word adjusts Paragraph Spacing Before/After to 5 pt. With this option turned off (default setting), Word sets the spacing between paragraphs to the larger of Paragraph Spacing Before/After. With this option turned on, Word uses both values of Paragraph Spacing Before/After between paragraphs. This is the same functionality as in earlier versions of Word.
Don't add extra space for raised/lowered characters - This option prevents Word from inserting additional space between lines to accommodate raised or lowered characters.
Don't add leading (extra space) between rows of text - This option displays text without leading between the lines. This is the same functionality that exists in Word versions 5.x for the Macintosh.
Don't adjust line height to grid height in the table - When this option is turned on, the table row height snaps to the document grid. Used in East Asian text.
Draw underline on trailing spaces - Not used in U.S. English Word.
Expand/condense by whole number of points - This option rounds the measurement of the spacing for characters with condensed or expanded spacing to the nearest whole number.
Forget last tab alignment - This option forces tab settings at the end of lines to behave the same as in Word 97.
Lay out Autoshape like Word 97 - When an AutoShape with Top & Bottom wrapping style applied appears at the bottom of a page, Word forces the AutoShape behind the text.
Lay out footnotes like Word 6.x/95/97 - This option positions footnotes as they were in earlier versions of Word.
Lay out tables with raw width - This option allows Word to determine the width of a table (table width + table indent) and prevents a table from being laid out in an area that is too small. This option prevents the table from being clipped (cut off on the sides) or pushed off the page when it is aligned next to a floating object.
Lines wrap like Word 6.0 - Not used in U.S. English Word.
Print body text before header/footer - This option prints the main text layer before the Header/Footer layer, which allows for the process of PostScript codes in the text layer, the same way that Word 5.x for the Macintosh does. (This functionality is the reverse of the default order).
Print colors as black on noncolor printers - This option prints all colors as black, instead of using grayscale (different shades of gray) when you use a printer that does not print color.
Select entire field with first or last character - This option allows you to select the entire field when you select either the first or last character of the field result. This option does not work when the field code is displayed.
Set the width of a space like WordPerfect 5.x - WordPerfect calculates the width of a space in a proportional font differently from Word. In the WordPerfect interface, this default word spacing is named WordPerfect Optimal. The Word 97 text converters can use the WordPerfect formula for spacing.
Show hard page or column breaks in frames - If a frame contains a manual, or hard, page break or column break, Word displays it.
Substitute fonts based on font size - This option is used by the WordPerfect 6.x converter to make a font request based on font size first and, if a match is not found, to actually map the font.
Suppress extra line spacing at bottom of page - WordPerfect suppresses any extra line spacing from the last line on a page. For example, if line spacing is set to double, the final line on the page does not display white space below it.
Suppress extra line spacing at top of page like Word 5.x for the Mac - This option prevents Word from adding extra line spacing at the top of a page. If the line spacing for the line at the top of a page is set for more than single line spacing, Word ignores the extra spacing, so that the top margin does not increase.
Suppress extra line spacing at top of page - This option prevents Word from adding extra line spacing at the top of a page. If the line spacing for the line at the top of a page is set for more than single spacing, Word ignores the extra spacing, so that the top margin does not increase.
Suppress extra line spacing like Wordperfect 5.x - This option ensures that the layout of a converted WordPerfect document that is formatted with Automatic line height closely matches that of the original document.
Suppress Space Before after a hard page or column break - This option suppresses the space in a paragraph formatted with the Space Before option that follows a hard page break or column break.
Swap left and right broders on add facing pages - If a paragraph has a left border (not a box) and the Different Odd/Even Headers check box or Mirror Margins check box is selected, Word prints the border on the right, on odd numbered pages.
Treat \" as "" in mail merge data sources - In a data source, this option converts a delimiter composed of a backslash and quotation mark (\") to two quotation marks (" "), so that Word can recognize quotation marks.
Truncate font height - This option rounds the font size up or down, as in WordPerfect 6.x for Windows.
Use larger small caps like Word 5.x for the Macintosh - This option applies small caps formatting in Word version 6.0 for the Macintosh the same way as in Word version 5.x for the Macintosh, which produces slightly larger small capital letters.
Use line breaking rules - This option controls line breaks in a Thai language document.
Use printer metrics to lay out document - If this option is selected, Word uses the information from the printer driver that is installed, as in some earlier versions of Word. If this option is turned off (default), Word use built-in metrics to lay out the document. This means your document looks the same, no matter what printer driver is installed.
Use Word 2002 table style rules - This option will preserve layout compatibility of tables styles used in Word 2002. This is enabled automatically for Word 2003.
Use Word 6.x/95 border rules - This option suppresses paragraph borders when a paragraph is intersected by frames or wrapped drawing objects.
Use Word 97 line breaking rules for Asian text - This option uses Word 97 line-breaking rules for Asian text.
Wrap trailing space to next line - This option automatically moves any spaces that trail into the margin after a word at the end of a line to the beginning of the next line.
© 2026 Better Solutions Limited. All Rights Reserved. © 2026 Better Solutions Limited TopPrevNext