2003 Options
The screenshots below are from Excel 2003 Options. These were all replaced in 2007.
Calculation Tab, Calculation
For more information please refer to the Formulas > Calculation page.
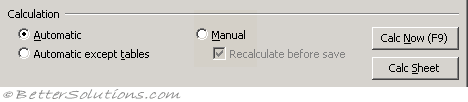 |
Automatic - Calculates all dependent formulas every time you make a change to a value, formula or name. Any workbook that contains formulas will be automatically calculated when it is opened. This is the default calculation setting. (Formulas tab)
Automatic except tables - Calculates all dependent formulas except those in data tables. You can calculate the formulas in data tables by pressing the "Calc Now" button. (Formulas tab - Automatic except for data tables)
Manual - Calculates only when requested by the user. (Formulas tab)
Recalculate before save - Calculates all dependent formulas in the worksheet before it is saved. (Formulas tab - recalculate workbook before saving)
Calculate Now - Calculates all open worksheets, including data tables, and updates all open chart sheets. (Ribbon, Formulas tab)
Calc Sheet - Calculates the active worksheet and any charts and chart sheets linked to this worksheet. (Ribbon, Formulas tab)
Calculation Tab, Iteration
For more information please refer to the Circular References page.
 |
Iteration - This can be used to restrict the iteration when using circular references. (Formulas tab - enable iterative calculation)
Maximum iterations - This is the maximum number of iterations used before iteration will stop. The default is 100. (Formulas tab)
Maximum change - The largest number that the change in value, must be less than, before iteration will stop. The smaller the number the more accurate the result. The default is 0.001. (Formulas tab)
Calculation Tab, Workbook Options
The following options are all workbook specific and affect all the worksheets in the active workbook.
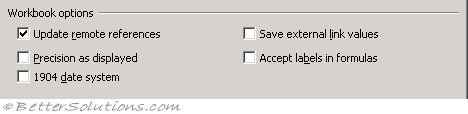 |
Update remote references - Calculates and updates formulas that include references to other applications and any external functions using a DDE. (Advanced tab, When calculating this workbook - update links to other documents)
Precision as displayed - Changes all the underlying values in your worksheet to be the same as their displayed valued. This will change values permanently from having 15 significant figures to whatever format is displayed. This cannot be undone. (Advanced tab, When calculating this workbook)
1904 date system - Changes the starting date from which all dates are calculated from January 1, 1900, to January 2, 1904. (Advanced tab, When calculating this workbook)
Save external link values - Saves copies of values contained in an external document linked to a Microsoft Excel worksheet. If a worksheet with links to large ranges on an external document requires an unusually large amount of disk space or takes a very long time to open, clearing the Save external link values check box can reduce the disk space and time needed to open the worksheet. (Advanced tab, When calculating this workbook)
Accept labels in formulas - (Removed in 2007). Uses label names in formulas if ranges on your worksheet have row or column labels. Turning this off though mean that any labels that have been used will be replaced with their corresponding cell references. For more information please refer to the Natural Language Formulas page.
Chart Tab, Active Chart
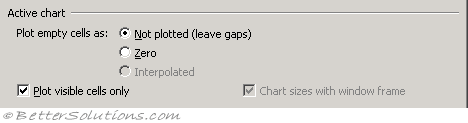 |
You will only be able to change these settings if you currently have a chart active.
Plot empty cells as - There are three choices: "Not Plotted" which ignores any blank cells and leaves gaps in the line: "Zero" which means blank cells are treated as zero, so the line drops to the zero-scale: "Interpolated" which means that any blank cells will have a connecting line meaning there are no gaps. (Select Data Source, Hidden and Empty Cells).
Plot visible cells only - If ticked will only plot visible cells and any hidden cells will not be plotted. (Select Data Source, Hidden and Empty Cells).
Chart sizes with window frame - (Removed in 2007). This is only appropriate for charts on separate chart sheets, not for embedded charts. This will ensure the chart always fills the window.
Chart Tab, Chart Tips
 |
Show names - Displays the item of the chart when you hover over it. (Advanced tab, Display - show chart element names on hover)
Show values - Displays the value of a data marker when you hover over it. (Advanced tab, Display - show data point values on hover)
Color Tab, Colour Palette
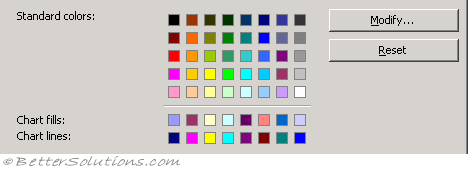 |
Standard colors - Any colour that is not displayed on this palette will simply not be displayed in your workbook. The nearest colour to it will be displayed instead. You can edit any of the original 56 colours on the colour palette to create custom colours. (Save tab, Colors)
Modify - This allows you custom the color palette and change the colours available. You can only have a total of 52 colours available in a workbook. For more details on changing the colours in a workbook please refer to the specific Formatting > Colours page. (Save tab, Colors)
Reset - This will reset the colours in the active workbook to the default. The colours that are displayed here are the default colours. (Save tab, Colors)
Chart fills - These are the 8 colours that will be used for your blocks of colour. These will be applied to bar charts, column charts, area charts etc. The order in which these colours appear is significant. The first colour to be used is the one on the left. (Save tab, Colors)
Chart lines - These are the 8 colours that will be used for you lines of colour. These will apply to line charts. The order in which these colours appear is significant. The first colour to be used is the one on the left. (Save tab, Colors)
Color Tab, Copy Colours From
 |
Copy colors from - Copies the colour palette from another workbook to the active workbook. You can only copy colours from a workbook that is currently open. Just select the workbook name in the drop-down list. (Save tab, Colors)
Custom Lists Tab, Custom Lists
Hidden in 2007
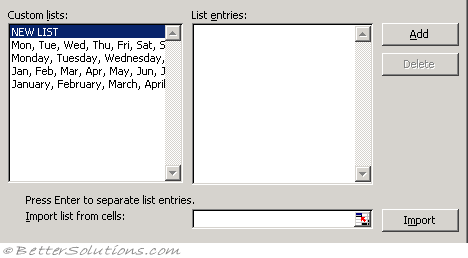 |
Custom lists - There are four lists available by default and these are to help with entering days and months. Click a list that you want to edit, or click New List in the Custom lists box to create a new list, and then type the entries in the List entries box. The first character cannot be a number. You can use the Enter key to separate each entry. (Popular tab, Top options, Edit Custom Lists)
Add - Allows you to create a new custom list. For more details on how to creating custom lists, refer to the Custom Lists page.
Delete - Removes a custom list, confirm the deletion by pressing OK.
Import list from cells - To import list entries from a worksheet range, click in the Import list from cells box, select the range on the sheet, and then click Import. The worksheet range must have each entry in a separate cell. The first character of an entry cannot be a number.
Import - Creates a custom list from existing items that you've listed in a worksheet range. Click in the Import list from cells box, select the range on the sheet, and then click Import.
Edit Tab, Settings
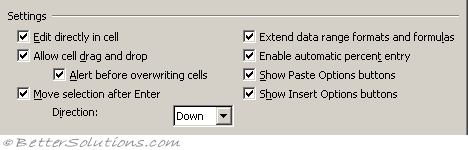 |
Edit directly in cell - Allows you edit directly in the cells without having to enter the formula bar. (Advanced, Editing options - allow editing directly in cells)
Allow cell drag and drop - Allows you to drag cell ranges and to use the Auto Fill feature. (Advanced, Editing options - enable fill handle and cell drag and drop)
Alert before overwriting cells - Displays a message box asking you to confirm when you drop cells over other cells that contain data. (Advanced tab, Editing options)
Move selection after enter - This is the direction that you will move in when you press Enter in a cell. You have the option to switch it off completely. (Advanced tab, Editing options - after pressing enter, move selection)
Extend data range formats and formulas - Automatically formats any new items added to the end of a list to match the format of the other items in the list. For formats to be extended automatically they must appear in at least three of the last five rows preceding the new row. Formulas that contain references to ranges will be automatically expanded when new cells are inserted to the right or below the existing range. In 2000 and 2002 this used to be the "Extend list formats and formulas". (Advanced tab, editing options)
Enable automatic percent entry - Automatically multiples any cells by 100 that are less than 1 and are formatted with the percentage number format ("0%"). (Advanced tab, editing options)
Show paste options buttons - Displays a smart tag next to the cell with special options when pasting, such as Formatting Only and Link Cells. (Advanced tab, Cut Copy Paste)
Show insert options buttons - Displays a smart tag next to the cell with special options when inserting cells, rows or columns, such as Formatting Same As Above, Clear Formatting ?? (Advanced tab, Cut Copy Paste)
Edit Tab, Other
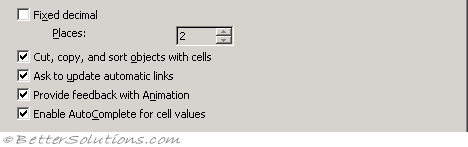 |
Fixed decimal - Default is not ticked. If checked the number of decimal places in the "Places" box indicates where Excel will automatically put a decimal point in the numbers you enter on to a worksheet. Positive numbers move the decimal point to the left and negative numbers move the decimal point to the right. If the Places box is left blank or set at 0 (zero), you need to enter the decimal point manually. To override this option, type a decimal point as you enter the number. For more details please refer to the Fixed or Floating Decimals page. (Advanced tab, Editing Options - automatically insert a decimal place)
Cut, copy, and sort objects in cells - Keeps placement of objects with cells that you cut, copy, filter, or sort. (Advanced tab, Cut Copy Paste)
Ask to update automatic links - Displays a message each time linked items are updated automatically. (Advanced tab, General)
Provide feedback with animation - Displays worksheet movement and changes when you insert or delete cells, rows, or columns. Animation may slow video performance on some systems. (Advanced tab, General)
Enable autocomplete for cell values - Completes text entries you start to type in a column of data. If the first few letters you type match an existing entry in that column, Microsoft Excel fills in the remaining text for you. When this option is checked all the entries in the same column (in the current region) are checked for possible matches. The remainder of the text is entered for you and highlighted. (Advanced tab, Editing Options)
Error Checking Tab, Settings
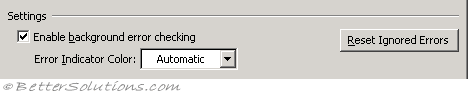 |
Enable background error checking - Select if you want Excel to check your cells for errors and display a smart tag indicator in the upper left corner of the cell. (Formulas tab, Error Checking)
Error indicator color - Automatic. Sets the colour Excel uses to indicate errors. If you click Automatic, the colour is set to the default colour of green. (Formulas tab, Error Checking)
Reset ignored errors - This will display a green indicator in the top left corner of any cells that contain errors. Errors can be ignored but this option will display them all again for the active worksheet. (Formulas tab, Error Checking)
Error Checking Tab, Rules
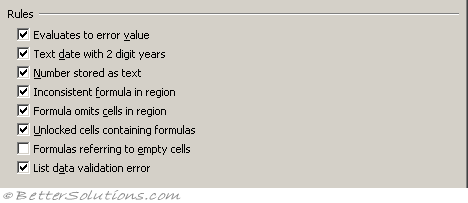 |
Evaluates to error value - Displays a green smart tag indicator in the top left corner if a cell contains an error. This will display the Error Checking Options smart tag. The default is ticked. (Formulas tab, Cells containing formulas that result in an error). more
Text date with 2 digit years - Select to have Microsoft Excel treat formulas that contain text formatted cells with years represented as 2 digits as an error and display a warning when checking for errors. The default is ticked. (Formulas tab - Cells containing years represented as 2 digits). more
Number stored as text - Select to have Microsoft Excel treat numbers formatted as text or preceded by an apostrophe as an error and display a warning. The default is ticked. (Formulas tab, Numbers formatted as text or preceded by an apostrophe). more
Inconsistent formula in region - Select to have Microsoft Excel treat a formula in a region of your worksheet that differs from the other formulas in the same region as an error and display a warning. The default it ticked. (Formulas tab, Formulas inconsistent with other formulas in the region). more
Formula omits cells in region - Select to have Microsoft Excel treat formulas that omit certain cells in a region as an error and display a warning. The default is ticked. (Formulas tab, Formulas which omit cells in a region). more
Unlocked cells containing formulas - Select to have Microsoft Excel treat an unlocked cell containing a formula as an error and display a warning when checking for errors. The default is ticked. (Formulas tab, Unlocked cells containing formulas). more
Formulas referring to empty cells - Select to have Microsoft Excel treat formulas that refer to empty cells as an error and display a warning. The default is not ticked. (Formulas tab, Formulas referring to empty cells). more
List data validation error - (Added in 2003). Select to have validation errors displayed in lists. The default it ticked. (Formulas tab, Data entered in a table is invalid). more
General Tab, Settings
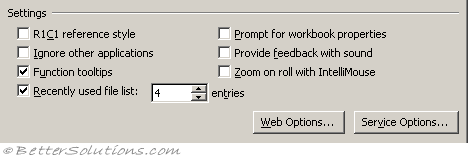 |
R1C1 reference style - Displays your columns as numbers and not as letters. (Formulas tab, working with formulas)
Ignore other applications - If this is checked and you double click on several files in Windows Explorer then a new instance of Excel will be opened for each file. (Advanced tab, General - ignore other applications that use Dynamic Data Exchange (DDE) )
Function tooltips - Displays yellow tags indicating the syntax of a worksheet function, when used in a formula. (Advanced tab, Display - show function screentips)
Prompt for workbook properties - (Removed in 2007). This as it will prompt you to fill in a few details whenever you create a new workbook. Very useful when searching for a particular workbook. Always fill in the keyword and category fields.
Provide feedback with sound - Play available sounds that are associated with Microsoft Office program events, such as opening, saving, and printing files, and displaying error messages. Sounds assigned to different events can be changed in the Sounds Properties dialog box in Windows Control Panel. If you select or clear the Provide feedback with sound check box in one Office program, it is also turned on or off for all other Office 97 programs. To change the sound that is associated with an event, open the Sounds folder in Windows Control Panel. Your computer must have a sound card to play most sounds. (Advanced tab, General)
Zoom on roll with intellimouse - Move around and zoom on your worksheet or chart sheet by using the Microsoft IntelliMouse pointing device. For more information about using the IntelliMouse pointing device, click. (Advanced tab, Editing Options)
Recently used file list - Set to 9 to display a list of your last 9 opened workbooks. (Advanced tab, Display - show this number of recent documents)
Web Options - Sets options for how your Microsoft Excel data will look and respond when the data is viewed in a Web browser. (not really relevant any more ??)
Service Options - (Added in 2003). Sets options for Customer Feedback Options, Online Content, and Shared Workspace. (Advanced tab, General)
General Tab, Other
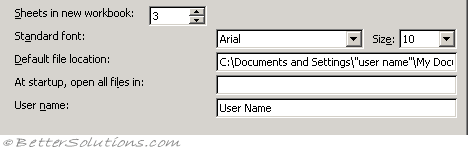 |
Sheets in new workbook - Adjusts the number of sheets displayed in a new workbook. The default is 9 although the spinner ranges from 1 to 255. (Popular tab, When creating new workbooks - include this many sheets)
Standard font - Arial, 10. Defines the font and font size that will be used as default in your new workbooks. You have to shut Excel down and re-start for any font changes to take effect. Note that this is also the font used in your row and column headings, as well as the font definition for the Normal style. The standard font is 10-point Arial. (Popular tab, When creating new workbooks - use this font)
Default file location - This is the default folder path that will be used when you display the (File > Open) dialog box. This folder path will default to your users 'My Documents' folder. This folder is not used when you press (File > Save As). (Save tab, Save Workbooks)
At start-up, open all files in - In Excel 97 and Excel 2000 this used to be the "Alternate startup file location". Any files in here are opened automatically in addition to those in the xlstart folder. This is often used to store custom add-ins or a workspace file that you will always want available or open every time you start Excel. (Advanced tab, General)
User name - Filling in your username will save you name in any workbooks that are created by you. This is shared among all your Microsoft Office applications so you only need to change it once. (Popular, Personalize your copy of Microsoft Office)
International Tab, Number Handling
 |
Decimal separator - To change the default decimal separator, deselect Use system separators then type over the default separator. (Advanced, Editing Options)
Thousand separator - To change the default thousands separator, deselect Use system separators then type over the default separator. (Advanced, Editing Options)
Use system separators - Select to use the default Decimal and Thousands separators. Clear to enter alternate separators. (Advanced, Editing Options)
International Tab, Printing
 |
Allow A4/Letter paper resizing - For some countries, the standard paper size is Letter; for others, the standard size is A4. Select this check box if you want Excel to automatically adjust documents formatted for another country's standard paper size (for example, A4) so they print correctly on your country's standard paper size (for example, Letter). This option affects the print-out only, not the formatting in your document. (Advanced, General - scale content for A4 or 8.5x11" paper sizes)
International Tab, Right-to-Left
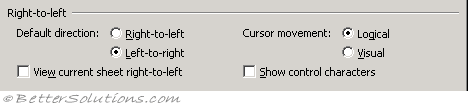 |
Default direction - left to right Sets the default direction of worksheets to a right-to-left direction, with cell A1 in the upper-right corner of the worksheet window. (only visible if you have a right to left language enabled)
View current sheet right to left - Sets this worksheet only to display with a right-to-left direction familiar to users of languages that flow from the right to the left. For example, displays cell A1 in the upper-right corner of the worksheet window and sets cell reading order to right-to-left, with text flowing to the left. Other sheets in this workbook will remain left-to-right. (only visible if you have a right to left language enabled)
Cursor movement - Determines how the insertion point moves through bi-directional text.
Show control characters - Shows or hides bi-directional control characters.
Save Tab, Settings
This was to replace the AutoSave add-in that existed in Excel 97 and Excel 2000.
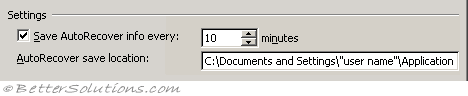 |
Save autorecover info every - (Added in 2002). This is turned on by default and is set to every 10 minutes. (Save tab)
AutoRecover save location - (Added in 2002). This is set to a subdirectory of the Windows application directory, although it can be changed. The default directory is:
Excel 2003 - C:\Documents and Settings\"user name"\Application Data\Microsoft\Excel\
Excel 2002 - C:\Documents and Settings\"user name"\Application Data\Microsoft\Excel\
Save Tab, Workbook Options
 |
Disable autorecover - This disables the auto recovery feature for the active workbook. (disable recover for this workbook only)
Security Tab, File Encryption
 |
Password to open - (Moved in 2007). This can be accessed from the Save As dialog box.. Selecting Tools, General Options. Type a password in the Password to open box to prevent others from opening a workbook without the password. A password is case sensitive and can contain up to 15 characters, including letters, numbers, and symbols. If you lose the password, you cannot open the workbook.
Advanced - (Moved in 2007). Displays a dialog box allowing you to change the type of encryption used.
Security Tab, File Sharing
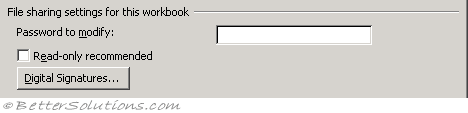 |
Password to modify - (Moved in 2007) This can be accessed from the Save As dialog box. Selecting Tools, General Options. Type a password in the Password to modify box to prevent another user from opening, making changes in, and saving the workbook without a password. If someone opens the workbook as read-only and changes it, it must be saved with a different name. A password is case sensitive and can contain up to 15 characters, including letters, numbers, and symbols. If you lose the password, you cannot open the workbook.
Read only recommended - (Moved in 2007) This can be accessed from the Save As dialog box. Selecting Tools, General Options. Recommends that others open a workbook as read-only. If someone opens the workbook as read-only and changes it, it must be saved with a different name.
Digital signatures - (Moved in 2007) This has been replaced with a Signatures Task Pane that can be accessed by double clicking on the signatures icon on the status bar. Allows you to view a log of users who have digitally signed this document and add your own signature.
Security Tab, Privacy Options
 |
Remove personal information from this file on save - (Removed in 2007). Select to limit the information that is given on the Summary tab of the properties dialog for this document when saved. This functionality was replaced with the Inspect Document option in Excel 2007.
Security Tab, Macro Security
 |
Macro Security - Displays the (Tools > Macro > Security) dialog box.
Spelling Tab, Spelling
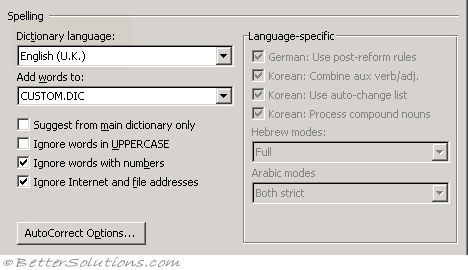 |
Dictionary language - Select the dictionary you want to use when you check the spelling. This can be useful to change if your workbook contains words from another language. (Popular, Personalize your copy of Microsoft Office)
Add words to - Adds the word that appears beside Not in dictionary to the custom dictionary you select. Microsoft Excel uses the selected custom dictionary in addition to the main dictionary when checking spelling.
Suggest from main dictionary only - Suggests correct spellings from the main dictionary but not from any open custom dictionaries. Clear this check box if you want Excel to suggest correct spellings from all open custom dictionaries as well as from the main dictionary.
Ignore words in uppercase - Ignores words in UPPERCASE letters during a spelling check. This also ignores any acronyms that use all capital letters.
Ignore words with numbers - Ignores words that contain numbers during a spelling check.
Ignore Internet and file addresses - Select this check box if you want Word to automatically ignore internet addresses (e.g. https://www.bettersolutions.com), file names (e.g. C:\temp\File1.xls) and electronic mail addresses (e.g. feedback@bettersolutions.com) during a spelling check.
AutoCorrect Options - Displays the (Tools > AutoCorrect Options) dialog box. For more details on the AutoCorrect options, please refer to the AutoCorrect section.
Transition Tab, Saving
Save Excel files as - Allows you to change the default file type used when saving your workbooks. Make sure your file type is "Microsoft Excel Workbook" to ensure that your workbooks are saved in the most recent version of Excel. (Save tab, Save Workbooks - save files in this format)
Transition Tab, Settings
Microsoft Excel menu or Help key - This is the key that can be used as an alternative to the Alt key to activate your menus. The slash key (/) is the default. (Advanced, Lotus Compatibility - Microsoft Office Excel menu key)
Transition navigation keys - This changes all sorts of navigation keys and how formulas and labels are entered. Useful if you are a user making the transition from Lotus 1 2 3 but otherwise do not have this checked. (Advanced tab, Lotus Compatibility Settings)
Transition Tab, Sheet Options
Transition formula evaluation - Opens and evaluates Lotus 1-2-3 files without losing or changing information. With this option selected, Microsoft Excel evaluates text strings as 0 (zero), Boolean expressions as 0 or 1, and database criteria according to the rules used in Lotus 1-2-3.
Transition formula entry - Converts formulas entered in Lotus 1-2-3 release 2.2 syntax to Microsoft Excel syntax, and makes names defined in Microsoft Excel behave like names defined in Lotus 1-2-3.
View Tab, Show
 |
Startup task pane - (Removed in 2007). Displays the Task Pane when you open Excel.
Formula bar - Displays the formula palette and name box at the top of the worksheet. The formula bar is very useful for creating nested formulas and the name box is very useful for displaying cell references and creating named ranges. This can also be toggled from the drop-down menu (View > Formula Bar). (Advanced, Display - show formula bar)
Status bar - (Removed in 2007). Displays information about a selected command or option at the bottom of the program window. It also includes an Auto Calculate box in the bottom left. If the status bar is not displayed then you are shown an additional row. This can also be toggled from the drop-down menu (View > Status Bar). It is possible to hide the status bar using VBA code though.
Windows in taskbar - Displays all the workbooks and windows in your Excel instances as separate items on the task bar. You will probably find this annoying to start with but it is a good way to try and reduce the number of workbooks open at any one time. (Advanced, Display, Show all windows in the taskbar)
View Tab, Comments
 |
None - Displays no comments or comment indicators. (Advanced, Display - no comments or indicators)
Comment indicator only - Displays a small red triangle in the upper-right corner of any cell that contains a comment. The comment will be automatically displayed when you place the mouse pointer over the cell. (Advanced, Display - indicators only, and comments on hover)
Comment & indicator - Displays the comment indicator and the comment all the time. (Advanced, Display - comments and indicators)
View Tab, Objects
 |
Show all - Displays all graphic objects, buttons, text boxes, drawn objects and pictures. (Advanced, Display options for this workbook - for objects, show all)
Show placeholders - (Removed in 2007). Displays pictures and charts as grey rectangles. This can significantly increase the speed when scrolling around a worksheet containing a lot of objects. Any buttons, text boxes, or other types of graphic objects are not displayed as grey rectangles only charts and pictures.
Hide all - Displays no graphic objects, buttons, text boxes, drawn objects or pictures. Be aware that any hidden objects are not printed. Tracer arrows will not be displayed and a lot of the formula auditing commands will be disabled. (Advanced, Display - for objects, show nothing)
View Tab, Window Options
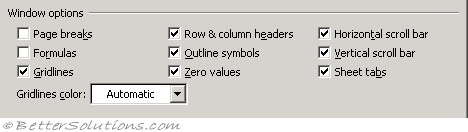 |
The following options are all worksheet specific and only affect the active worksheet.
Page breaks - Displays any page breaks using dotted lines, including those that have been created automatically. (Advanced, Display options for this worksheet - show page breaks)
Formulas - Displays the actual formulas inside the cells instead of the values that the formulas produce. Any alignment formatting is ignored as cell formulas are always aligned on the left. This can be useful when checking formulas are valid although beware that it will double the width of your columns. You can alternatively use the shortcut key (Ctrl + ` ). (Advanced, Display options for this worksheet - show formulas in cells instead of their calculated values)
Gridlines - Displays the cell gridlines. You can change the colour of the gridlines by altering the colour in the drop-down box at the bottom. If you want gridlines printed but not displayed choose (File > Page Setup)(Sheet tab, Gridlines).(Advanced, Display options for this worksheet - show gridlines)
Gridlines color - Changes the colour of your gridlines. If you click Automatic, the color is based on the text color defined in the Windows Control Panel. (Advanced, Display options for this worksheet -
Row & column headers - Displays the row and column headers. If you want row and column headers printed but not displayed choose (File > Page Setup)(Sheet tab, Row and Column headers). (Advanced, Display options for this worksheet - show row and column headers)
Outline symbols - Displays outline symbols. Microsoft Excel does not display outline symbols unless the worksheet contains a previously created outline. For more details please refer to the Outlines page. (Advanced, Display options for this worksheet - show outline symbols if an outline is applied)
Zero values - Displays a number zero in any cells that contain a zero value. This can make a significant difference to the results returned from functions. Choosing not to display zeros may be useful for presentation purposes though. (Advanced, Display options for this worksheet - show a zero in cells that have zero value)
The following options are all workbook specific and affect all the worksheets in the active workbook.
Horizontal scroll bar - Displays the horizontal scroll bar in your worksheets. (Advanced, Display options for this workbook - show horizontal scrollbar)
Vertical scroll bar - Displays the vertical scroll bar in your worksheets. (Advanced, Display options for this workbook - show vertical scrollbar)
Sheet tabs - Displays sheet tabs at the bottom of a workbook so that you can manoeuvre and select multiple worksheets easily. (Advanced, Display options for this workbook - show sheet tabs)
© 2026 Better Solutions Limited. All Rights Reserved. © 2026 Better Solutions Limited TopPrevNext