Page Setup
Page Tab
Orientation
Orientation refers to the direction that the data will be printed on the paper.
 |
Portrait - When text is printed parallel to the shorter edge, like a letter (top to bottom). This is the default.
Landscape - When text is printed parallel to the longer edge (side ways). Printing landscape allows you to fit more columns per page and is ideal when you have a wide worksheet.
Scaling
You can either print out your worksheets exactly as they are or you can reduce or enlarge them to fit better on the page or across a number of pages.
You can use the scaling feature to increase and decrease the size of data on a printed page. Useful if you want the data to fit a specific number of pages.
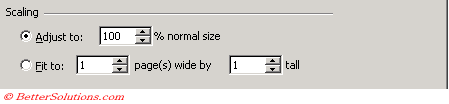 |
Adjust to - Reduces or enlarges the printed worksheet by specifying a scaling factor. Select the Adjust to check box, and then enter a percentage number in the % normal size box. You can reduce the worksheet to 10 percent of normal size or enlarge it to 400 percent of normal size. This allows you to scale your output so it can be adjusted to maximise the use of space on your page.
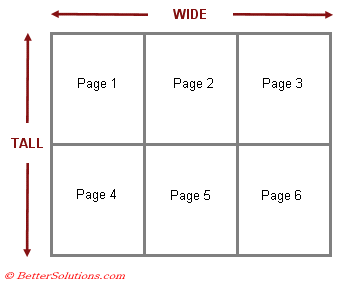
Fit to - Reduces the worksheet or selection when you print so that it fits on the specified number of pages. Select the Fit to check box, enter a number in the page(s) wide by box, and enter a number in the tall box. To fill the paper width and use as many pages as necessary, type 1 in the pages(s) wide by box and leave the tall box blank. This allows you to determine the number of pages you want to use to print your data on. This can be used to automatically scale your worksheets accordingly.
 |
Other
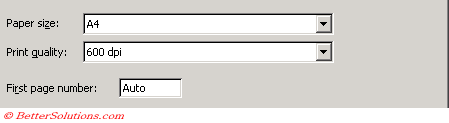 |
Paper Size - Click Letter, Legal, or other size options to indicate the size you want your document or envelope printed. Excel will come will some pre-defined paper sizes. Obviously the most common sizes are A4 and Letter. Your printer driver could also affect the entries in this drop-down list.
Print Quality - Click the resolution you want to specify print quality for the active worksheet. Resolution is the number of dots per linear inch (dpi) that appear on the printed page. Higher resolution produces better quality printing in printers that support high-resolution printing.
First Page Number - Enter Auto to start numbering pages at "1" (if it is the first page of the print job) or at the next sequential number (if it is not the first page of the print job). This can be useful if you are printing from multiple workbooks and you want to combine the data.
Remember
A percentage over 100 will increase the size of the printed data and a percentage under 100 will reduce the size of the printed data. Any scaling that is done is done in both the horizontal and vertical directions.
The "Fit To" option is very useful if the last page of your worksheet contains a small amount of data and you want to squash all the data up slightly so it will fit on the second to last page.
If you use the print option "Fit to X pages wide by Y tall, don't try and set any manual page breaks as these will be ignored.
You can have Excel "autoscale" the data to fit the paper width by entering "1" in the page(s) wide box and leaving the page(s) tall box empty.
Margins Tab
Each printer driver has a minimum margin size defined which is enforced regardless of what you enter into this dialog box.
Margins determine the amount of space between your data and the edge of the paper.
Default Margins
Default margins are: left: 0.75, right 0.75, top: 1 and bottom: 1. All margin measurements are in inches.
What are the default margin sizes in mm ? (1 inch = 25.4 mm)
Adjusting the margins can be an effective way to fitting slightly more on a page.
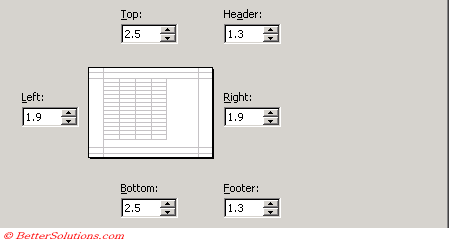 |
This allows you to determine the amount of space between the edge of the paper and your data.
The Preview box will give a good indication as to how the page will look when it is printed.
Top - The distance from the top of the paper to the start of the data.
Header - The height of the header.
Left - The distance from the left side of the data to the edge of the paper.
Right - The distance from the right side of the data to the edge of the paper.
Footer - The height of the footer.
Bottom - The distance from the end of the data to the bottom of the paper.
If you are using the headers and footers then make sure your top and bottom margins are larger than your header and footer margins.
You can alternatively change the margins by dragging them visually in the Print Preview window.
You can change the location of your headers and footers by using the "Margins" tab, and adjusting the "From Edge" value.
Removing all margins
Each printer driver has a minimum margin size defined which is enforced regardless of what you enter into this dialog box.
Changing all the margins to zero is very confusing and does not mean that there are no margins.
SS
Margins will only be displayed in your print preview when these values are not zero - there are no black lines or boxes when these are zero
SS
The smallest margins are: left 0.6, right 0.6, header 0.6, footer 0.6, bottom 0.6.
Center on page
 |
Horizontal - Centres your data horizontally on the paper.
Vertical - Centres your data vertically on the paper.
Remember
All margin measurements entered on this dialog box are in inches.
Sheet Tab
Print Area
 |
This lets you define the cell range that you would like to print and is exactly the same as using (File > Print Area > Set Print Area).
Clicking in this box will allow you to drag the mouse over the desired cell range.
The button on the far right of the text allows you to minimise and maximise the dialog box allowing you to see more of your worksheet.
Print Titles
Print titles are rows or columns that you want to appear on every page.
This lets you define any rows or columns that you would like to appear on every page
Print titles will not be set for you automatically and must be set manually.
 |
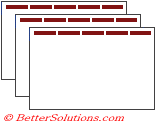
Rows to repeat at top - Allows you to repeat a group of rows across the top of each page.
 |
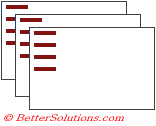
Columns to repeat at the left - Allows you to repeat a group of columns down the left side of each page.
 |
You only need to select one cell in each row or column containing the titles you want to repeat.
The text selected can include any number or adjacent rows or columns or a combination ??
To remove any print titles make sure that both these boxes are empty.
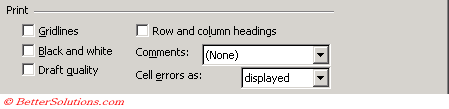 |
Gridlines - If you want to include the gridlines when you print out a worksheet. Gridlines are not displayed by default and printing a large worksheet with gridlines may take slightly longer.
If you want to display gridlines on part of your worksheet but not all of it you can apply a faint border to these cells and then remove printing gridlines.
Black and White - This should be used when you don't want to print colour from your colour printer. It can also help to make coloured worksheets look better when printed on a black and white printer.
Draft quality - This will print your worksheets with a reduced amount of formatting. Printing in draft is normally a lot quicker since gridlines and graphics are not included.
Row and column headings - This will display the column letters and the row numbers on your page.
Comments - The available options include "End of Sheet" which will insert another page at the end of the printout containing all the comments and the other option is "As Displayed on" which will print the comments exactly as they are displayed on the worksheet.
Cell errors as - Select the worksheet with the error you don't want to print. <blank>, -- , or #N/A.
Page Order
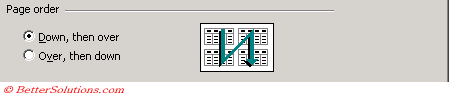 |
Down, the over - Click Down, then over or Over, then down to control the order in which data is numbered and printed when it does not fit on one page. The sample picture previews the direction your document will print when you choose one of these options.
Over, then down -
Remember
Changing any of these options will not affect how the worksheet is displayed on the screen.
You can see how the repeated titles will actually look like by using the Print Preview feature.
© 2026 Better Solutions Limited. All Rights Reserved. © 2026 Better Solutions Limited TopPrevNext