Worksheet Level
Worksheet level named ranges are worksheet specific and are normally only used on the worksheet where they have been defined.
They do allow you to use the same named range on different worksheets but they are only displayed when that particular worksheet is active.
The (Insert > Name > Define) dialog box only displays "worksheet level" named ranges for the active worksheet.
These can only be created by preceding the named range with an exclamation mark followed by the name of the worksheet.
It is possible to refer to these from other worksheets, but they must be preceded with the worksheet name (e.g. =Sheet1!Named_Range).
Using worksheet and workbook level names in the same workbook can get a bit confusing.
Displaying the Named Ranges
These only appear in the Name box when that particular worksheet is active.
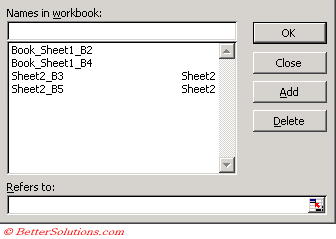
These are prefixed with the name of the worksheet when viewed in the (Insert > Name > Define) dialog box.
When you display the (Insert > Name > Define) dialog box any worksheet level named ranges have their respective worksheet name on the right hand side.
Worksheet level named ranges will only appear in this dialog box when the current worksheet is active.
 |
Editing Named Ranges
You cannot use the Name Box to redefine any existing named ranges. This has to be done from the (Insert > Name > Define) dialog box.
You can redefine your named ranges using the (Insert > Name > Define) dialog box.
Select the named range from the list and edit the cell reference in the Refers to box.
You can either type in the new reference or you can select a range of cells directly.
Removing a Worksheet Level Named Range
Display the (Insert > Name > Define) dialog box.
Select the named range from the list and press Delete.
If you want to rename a named range then you can select (Insert > Name > Define) and change the name in the text box.
Remember
Avoid copying a formula that includes a named range from one workbook to another as this creates a hidden link between the two workbooks.
If you have formula using a named range and then delete the named range, the formula will return the #NAME? Error.
Remember to use the arrow keys to manoeuvre within the named range formula and not the mouse.
It is possible to use worksheet specific named ranges on other worksheets by prefixing the named range with its worksheet name (e.g. Sheet2!Sheet2_B3).
Only the worksheet level named ranges on the active worksheet are displayed in the Name Box and in the (Insert > Name > Define) dialog box.
If you create a named range and then realise that you want to change the name you must delete the old name and create the named range again.
If the named range already exists you cannot use the Name Box to change the reference.
Creating
Select (Insert > Name > Define) to display the Define Name dialog box.
The address of the active cell (or range) will appear in the "Refers to" box initially.
An alternative way to display this dialog box is to use the shortcut key (Ctrl + F3).
This allows you to define and apply new names, change existing names and remove names.
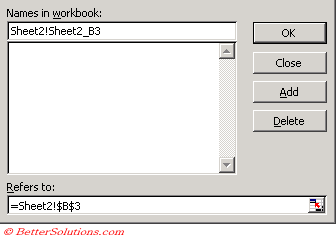
Lets create a "worksheet level" named range that refers to the cell "B3" on the worksheet "Sheet2".
To define a worksheet level name you must precede the descriptive name with the name of the worksheet, followed by an exclamation mark.
Select the cell or range of cells you want to add a descriptive name to, in this case select "B3" on worksheet "Sheet2".
Type in the following "Sheet2!Sheet2_B3" for the descriptive name.
 |
If the worksheet name contains any spaces then the worksheet name must be enclosed in single quotation marks.
Remember to use the arrow keys to manoeuvre within the named range formula and not the mouse.
It is possible to create a worksheet level named range with the same name as that of a workbook level named range although it is not encouraged.
The worksheet level named range always takes precedence, but obviously only on that particular worksheet.
Moving Sheets
3D Named Ranges
A 3D named range is a name that spans more than one worksheet.
The selected cell or range of cells must be identical for all the worksheets that are included.
="FirstSheet:LastSheet!RangeReference"
These named ranges must be created using the (Insert > Name > Define) dialog box and not the Name Box.
For more information on 3D formulas, please refer to the 3D Formulas page.
What can I use a 3D Named Range for ?
A 3D reference is a reference that refers to the same cell or range on multiple worksheets.
It is possible to use 3D references in your formulas and functions.
The 3D cell reference "=SUM(Sheet1:Sheet4!A2)" can be used to add up the numbers in cell "A2" on 4 different worksheets.
Instead of using this 3D cell reference (Sheet1:Sheet4!A2) you could use a 3D named range instead.
Summarising your worksheets
Lets assume that we have a workbook that contains five worksheets and that four of them contain data for specific years.
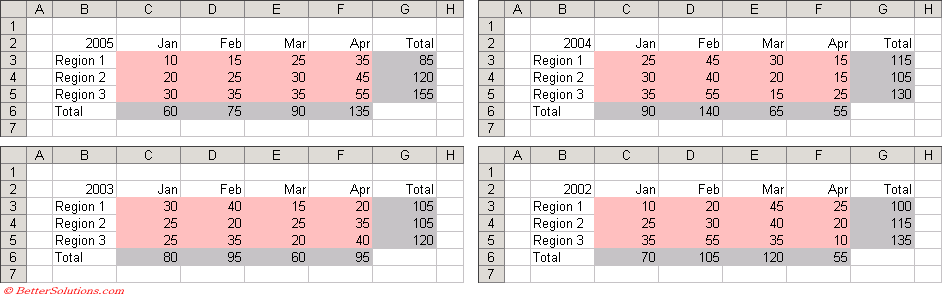
Four of the worksheets correspond to the sales figures for the years 2005 - 2002 and the first worksheet is intended to be a summary of these four years.
 |
On the Summary worksheet we want to be able to quickly return the total for all the Regions and for the months.
It is possible to create 3D named ranges which refer to all four worksheets which will make the formulas in the summary table a lot easier to understand.
Lets assume that each of the four worksheets contains the following table of data.
 |
Defining your 3D Named Range
We are going to define a 3D named range for each of the items we want to total.
The first item in our summary table is the total for Region 1.
Select (Insert > Name > Define) to display the Define Name dialog box.
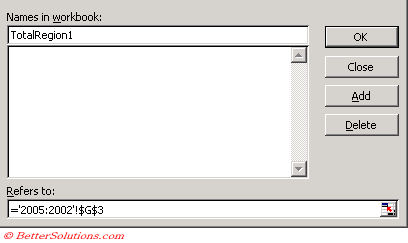
In the Names box at the top type in the name of your named range, in this case "TotalRegion1"
Click in the Refers to box and press the equal sign (=).
Select the "2005" worksheet tab with the mouse.
Hold down the Shift key and select the "2002" worksheet tab with the mouse.
The formula in the Refers to box should now be ='2005:2002'!'.
Select the cell "G3" on the active worksheet and press "Add" to create the 3D named range.
 |
Press OK to close the dialog box.
Inserting the Formula
Once the 3D named range has been created you can use this named range in your formulas and functions.
It is now extremely easy to obtain the overall total for Region 1.
Create the following table on the Summary worksheet.
In cell "C2" we are going to insert a formula to return the total for Region 1.
We are going to use the 3D named range as the argument for the SUM() function.
It is possible to quickly insert a named range into a formula (or function) by pressing (Insert > Name > Paste) from within the formula (or function).
Type the following and then insert the named range "TotalRegion1".
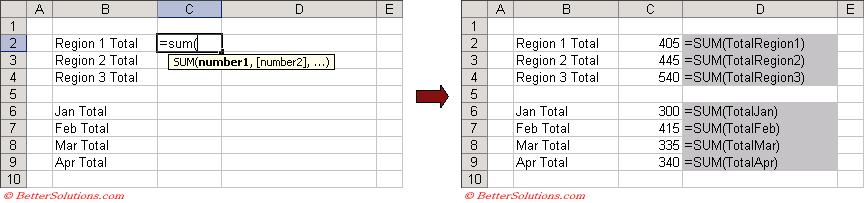 |
Repeat the above steps for the other six totals to create your summary worksheet.
Remember
If you insert a new worksheet between the worksheets defined in a 3D named range, then the new worksheet will automatically be included.
Deleting either the first worksheet or the last worksheet used in a 3D named range will automatically change the reference to exclude that worksheet.
Deleting any worksheet in the middle of the 3D named range will leave the reference unchanged.
3D Named Ranges do not appear in the Name Box or the (Edit > GoTo) dialog box.
There is no way of selecting the cells which a 3D Named Range refers to.
© 2026 Better Solutions Limited. All Rights Reserved. © 2026 Better Solutions Limited TopPrevNext